
With ranking rules in EasyFinder, you can control which products appear higher or lower in search results. Use them to boost specific products, prioritize in-stock items, promote certain brands, or push down products you want to de-emphasize. This gives you full control over how your results are ranked.
Step 1. Open the Ranking Rules #
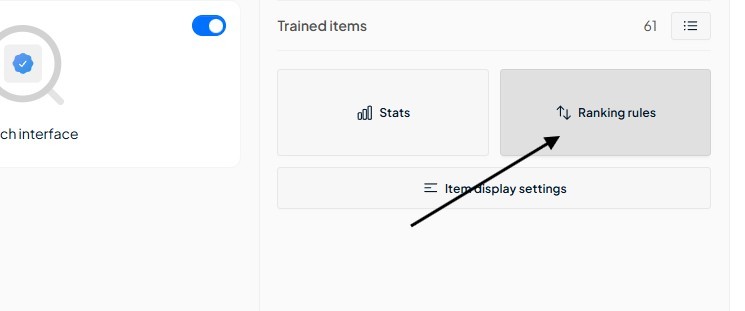
Log in to app.easyfinder.ai and go to Ranking rules in the dashboard.
Here you’ll find an overview of all your existing rules. To create a new one, click Add ranking rule.
Step 2. Name your rule #
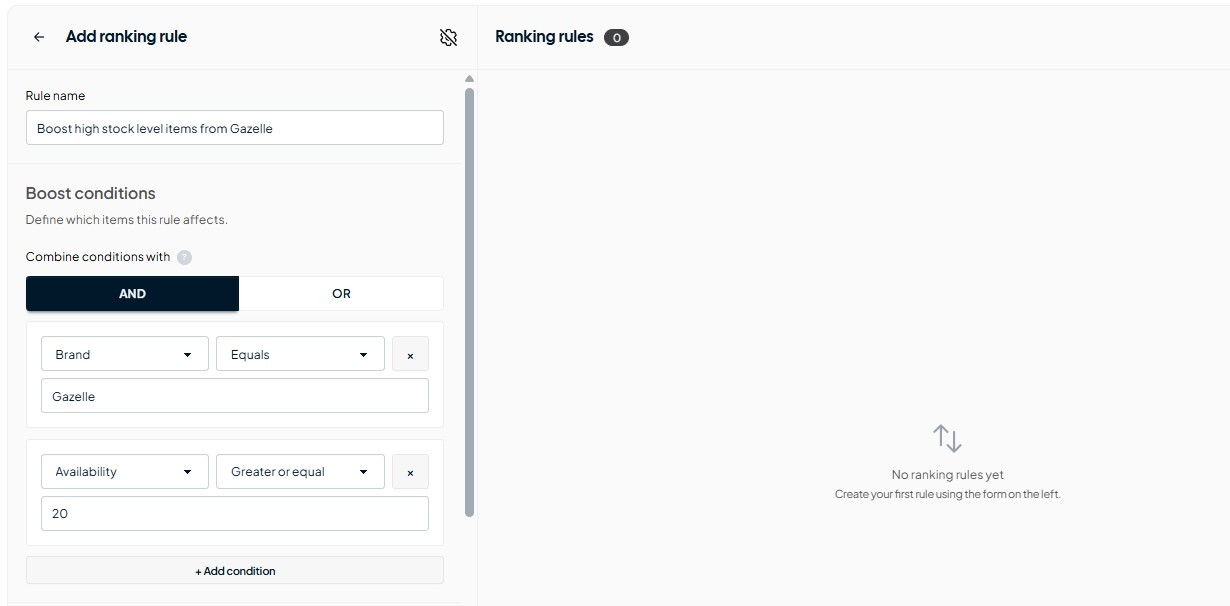
Start by giving your rule a clear name. This is only for your own reference, so pick something descriptive.
For example: Boost brand Adidas, Demote out of stock, or Push summer collection.
Step 3. Set the Condition Logic #
Next, choose whether your rule uses AND or OR logic. This matters when you add multiple conditions:
- AND means all conditions must be true for the rule to apply.
- OR means the rule applies if any of the conditions is true.
For example, if you want to boost products that are from brand “Adidas” and are in stock, use AND. If you want to boost products that are from “Adidas” or “Nike”, use OR.
Step 4. Add Conditions #
Click Add condition to define what products this rule should target.
Each condition has three parts:
- Attribute – Select a field from your feed, such as
Brand,Availability, or any custom field available in your data. - Operator – Choose how the attribute should be compared. The available options are:
- Value – Enter the value to compare against. This can be text (e.g.
Adidas) or a number (e.g.0), depending on the operator you selected.
| Operator | Description |
|---|---|
| Equals | The value must be an exact match. |
| Not equals | The value must not match. |
| In | The value must be one of the specified values. |
| Not in | The value must not be any of the specified values. |
| Greater or equal | The value must be greater than or equal to the given number. |
| Less or equal | The value must be less than or equal to the given number. |
You can add as many conditions as you need by clicking Add condition again. All conditions follow the AND/OR logic you set in the previous step.
Step 5. Set the Boost Score #
Under Boost score, use the slider or input field to set a value between -100 and +100.
- A positive score (e.g. +50) pushes matching products higher in the results.
- A negative score (e.g. -30) pushes matching products lower in the results.
The higher the absolute value, the stronger the effect.
Step 6. Optional: Schedule the Rule #
Under “When should this rule work?”, you can optionally set a start date and end date.
This is useful for time-limited promotions or seasonal campaigns. If you leave it empty, the rule will be active as long as it’s enabled.
Step 7. Optional: Limit to Specific Queries #
By default, a ranking rule applies to all search queries. If you want it to only trigger on specific searches, enable “Specific queries” under Query trigger and define the search terms.
Step 8. Save and Manage #
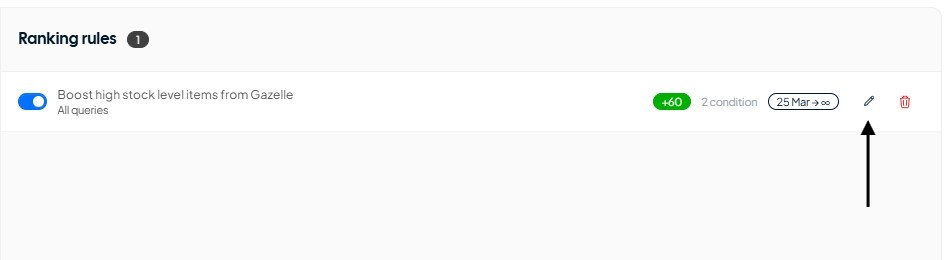
Click Save to activate your rule. It will appear on the right side of the screen in your rules overview.
You can always edit an existing rule by clicking the edit button next to it.
Common Use Cases #
Here are a few practical examples to get you started:
| Goal | Condition | Score |
|---|---|---|
| Boost a specific brand | Brand Equals Adidas |
+60 |
| Demote out-of-stock products | Availability Equals 0 |
-80 |
| Promote high-stock items | Availability Greater or equal 10 |
+40 |
| Push down specific brand | Brand Equals NoName |
-50 |
Once your rules are saved, EasyFinder will apply them automatically to every search. You can combine multiple rules to fine-tune your results exactly how you want.


 English
  Dutch
Dutch